This entry was originally posted on Saturday, October 6, 2012
Painting is drawing with color.
This entry was originally posted on Saturday, October 6, 2012
Painting is drawing with color.
This entry was originally posted on Monday May 21, 2012

Proportion
can be a difficult concept to grasp as you are drawing.
Especially
if the mathematics of it eludes you.
Well,
there is an easy way to draw in proportion if you are drawing from a photograph
or a sketch.
And
it doesn't require math.
Which
is even better.
First
take your photograph and draw a diagonal line from the lower left to the upper
right corner.

Next place a piece of tracing paper over top of your photo and draw the side and bottom edges, extending the lines out. This creates 2 lines that are perpendicular to each other.


Then find the height which you want to work with and draw a line that will meet the diagonal line.

Where
that line meets the diagonal line, draw another line down.

This size is now in proportion to your photo and you can use it to draw a more accurate drawing.
This entry was originally posted on Sunday, May 20, 2012

Drawing for Autumn's Bounty
Today's Sunday
Secrets is a question that I
was asked a couple of times during my studio tour concerning my poured
watercolors.
The question is:
How do you know where to put your masking fluid?
That is a very good question.
I first draw out what I am going to paint.
I make sure this drawing is dark.
Usually you draw with a light pencil line but for pours, you
need the pencil lines dark.
This is because when you wet the paper and add layer upon layer
of paint, the pencil line starts to fade.
If it isn't dark enough, that pencil line disappears by the time
you want to mask for the last couple of pours.
Then using my black and white photograph, I determine which
values I want to save with my masking fluid.
I start by saving the lightest value, which is white.
I apply the masking fluid to the white paper before I apply a
pour of paint.
Once the first pour has dried, I again look at my black &
white photo and figure out what the next value is that I want to save.
Then I apply the mask to that value and pour again.
I continue to build up the layers of masking fluid and paint
until I am left with the darkest areas.
Finally I remove the mask and viola!
I have my painting!
This entry was originally posted on Thursday, May 17, 2012

One
of the best ways to improve your drawing and painting skills quickly is to paint from life.
This
can be especially difficult for those that do their best painting at night.
Set
up a simple still life or go outside and paint (also called plein air
painting).
Especially
now that the weather is getting better.
Photos
tend to flatten out objects and landscapes.
When
you paint from life, you learn how to capture the 3 dimensionality or the
perception of depth of your subject better.
It
will also help you understand and paint that dimensionality when you do paint
from photographs.
This entry was originally posted on Wednesday, May 16, 2012
Modified Blind Contour is another drawing exercise.
It
is where you start off with blind contour but you allow yourself a couple of
peeks during the process.
This
is to reorient yourself and your drawing tool.
It
is sometimes best to time yourself with this because it can be tempting to take
lots of peeks.
One
suggestion is to give yourself 5 minutes to do a drawing.
Set
a timer at the 2 minute mark and again at the 4 minute mark.
You
can only peek at these two intervals.
It
will keep the temptation to look at bay.
This entry was originally posted on Tuesday, May 15, 2012

Blind
contour is
a drawing exercise that improves your eye-hand coordination.
It
is something that is often done in drawing classes and I have always enjoyed
the exercise.
The
concept of blind contour is that you are to draw your object without every
looking at the paper you are drawing it onto.
You
are to feel the object with your eyes as you draw it.


To
do blind contour, set up an object or two in front of you.
Cover
your hand with another piece of paper.
Slowly
follow the contours of the object as you slowly draw it onto your paper.
Do
not lift your pencil/pen as you do this.
If
you have to go back over an area, do so without lifting the pencil.
Do
not be tempted to look at your drawing until the end!
Blind
contour also makes for a great game with kids.
It
is always fun to see what silly things they can come up with from the same
object.
It
is also fun to see the improvement you will have in your own drawing over time.
This entry was originally posted on Monday, May 14, 2012

I
discovered long ago that when I sketch with a pencil in my sketchbook, I want
to erase.
And
erase some more.
I
probably spend more time erasing than sketching.
Then nothing gets drawn.
Does
that sound familiar?
If
you are someone that spends all your time sketching with your eraser more than
your pencil,
try
sketching with a marker or a pen instead.
The
temptation to erase is no longer there.
You
are forced to commit to a line.
This
commitment can be such freedom.
The
more you commit, the better you will get.
I
saw a huge improvement in my drawing skills when I gave up the pencil.
I'm
sure you will also.
But
please keep the marker to the sketchbook and don't use it on your watercolor
paper!
(My
mother would also recommend that you not use it on your sheets, walls, or
stuffed animals like I did when I was younger)
This entry was originally posted on Saturday, May 12, 2012

Carry
a sketchbook wherever you go.
Or
a tablet if you have one.
You
can sketch at games, in church, sitting in an airport, sitting on the bus, or
just waiting for time to pass.
It
can be a quick sketch or something more detailed.
It
is all about eye-hand coordination so it doesn't matter how long you spend on
it or if the sketch is completed.
All
that matters is that you practiced.
This entry was originally posted on Friday, May 11, 2012

Never
underestimate the importance of drawing.
Even
though I allow my students to trace a photograph,
I
tell them that drawing is an important skill that will improve their paintings.
Take
some time to practice your drawing skills by sketching what is around you.
It
doesn't need to be seen by anyone but you.
Remember
it is the process, not the product that counts.
This entry was originally posted on Monday, February 6, 2012.
When
I teach a class or workshop, I don't make my students draw out their work.
The
reason for this is that if I did have them draw, we would never get to
painting.
Instead
of drawing, I have them transfer a photocopy of what we will be painting onto
the watercolor paper.
This
is done by placing the photocopy onto the watercolor paper and taping it down
so it doesn't move while transferring.
Then
a piece of transfer (also called graphite) paper is placed underneath the
photocopy with the dark side down.
The
photocopy is then transferred onto the watercolor paper.
Now
you are ready to paint.
This entry was originally posted on Wednesday, February 1, 2012.
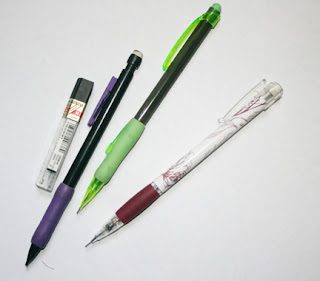
I
like a sharp point on my pencil when I draw. I use to be constantly sharpening
my special drawing pencils everywhere I went. I even went so far as to buy a
battery powered pencil sharpener. Ha! I found that I was so concerned with have
a sharp point that I never got to painting.
Then
many years ago I discovered how handy mechanical pencils can be.
No
more pencil sharpeners and I always have a sharp point.
Yay!
I
buy packages of them and have them all over the house and in my studio now.
The
lead in the mechanical pencils is usually a 2B, which works well.
Lead
that is too soft tends to smudge all over your paper when you brush your hand
against the paper as you work.
Extra
lead for mechanical pencils is also available as an H. This is harder than a 2B
and also works well.
Especially
if you are a smudger.
