Showing posts with label watercolor how-to. Show all posts

Sunday, February 20, 2022

Ruling Pen

 This entry was originally posted on Monday, February 20, 2012


My favorite way for applying masking fluid is with a ruling pen.

A ruling pen is an old drafting tool used for drawing lines with ink.

Instead I use it to draw lines of masking fluid.

The width of the line can be adjusted with the screw on top. 

A thin or a thicker line of masking fluid can be created.

Instead of holding it straight up and down to apply, hold it along the edge and have it glide across your paper like this:

The best part is that when the fluid dries, it can just be pulled off the tip of the ruling pen.

So much easier to use and clean up.


Update: I still love using a ruling pen. You can find these on Amazon by going to my store at 

https://www.amazon.com/shop/redheadart

Friday, February 18, 2022

Masking Large Areas

 This entry was originally posted on Saturday, February 18, 2012

You don't usually need to mask large areas but since I pour a lot of my paintings, I do need to protect large areas of my painting.

I have tried using mack-tack and the sticky shelf liner but discovered that it still needs to be sealed along the edges with masking fluid or the paint still can get under the mack-tack. Then the masking fluid leaves a line which many don't see but I do.

Instead I use the masking fluid to protect these large areas.

(Yes, I do use a lot but what else are you going to do with it?)

The easiest way to apply the masking to large areas is to first line the area with the masking fluid.

Then pour the fluid into the area and spread it with your finger.

The lined mask creates a damn and your finger puts it on quickly.

Plus it is easy clean up.

Just wash your hands afterwards.

But be careful not to spill it onto your clothes.

It will never come out!*


*Update: I have since discovered that Goo Gone will get masking fluid out of most clothes (but not all). 

Friday, February 11, 2022

Don't Eat the Cadmiums


  This entry was originally posted on Saturday, February 11, 2012.


They're poisonous.

So please don't eat them.

Wednesday, February 9, 2022

The Best Eraser

 This entry was originally posted on Thursday, February 9, 2012.

The best eraser to use on your watercolor paper is a kneaded eraser.

It is grey and comes in a square or rectangle shape when you buy it.

It is called a kneaded eraser because you can knead and shape it into different shapes.

So it ends up looking like a lump of clay.

What is great about it is that you can shape it into a point and erase in small areas.

It is also good to get up those smudges from the transfer paper without erasing the pencil lines you want to keep.

The best part is that the eraser is soft enough that it doesn't harm your paper.


Sunday, February 6, 2022

Easy Way to Draw

   This entry was originally posted on Monday, February 6, 2012.

When I teach a class or workshop, I don't make my students draw out their work.

The reason for this is that if I did have them draw, we would never get to painting.

Instead of drawing, I have them transfer a photocopy of what we will be painting onto the watercolor paper.

This is done by placing the photocopy onto the watercolor paper and taping it down so it doesn't move while transferring.

Then a piece of transfer (also called graphite) paper is placed underneath the photocopy with the dark side down.

The photocopy is then transferred onto the watercolor paper.

Now you are ready to paint.

Saturday, February 5, 2022

Sunday (Saturday?) Secrets #3

  This entry was originally posted on Sunday, February 5, 2012.

It is Sunday which means I get to answer another question that came into my email box this week.

The question this week is 

Do I ever mix brands of paint? 

The answer is yes and no.

Yes, I have all different brands of paint that I paint with.

My favorite brands are Daniel Smith and Winsor & Newton.

I also have a couple of Graham and Holbein colors in my collection that I really like.

There is nothing wrong with mixing different brands of paint.

However, I try to stick to the brand that I start a painting with.

For instance, if I am using Daniel Smith's French Ultramarine Blue in one painting and I run out in the middle of it, I will try to continue to use the Daniel Smith brand until that painting is finished.

The reason for this is that there are differences in the brands of paint. Some are subtle but some are not.

If the difference is not subtle then my painting will look weird if half of it is painted with one brand and the other half with the other brand.


Friday, February 4, 2022

Don't Draw on Your Paper!

  This entry was originally posted on Saturday, February 4, 2012.

Unless I am working plein air (painting outdoors) or from life, I try not to draw on my paper.

That is because when I draw, I want to erase.

Then draw again.

And erase again.

Then before I know it, I have ruined my beautiful paper with my multiple pencil marks, eraser smudges, and the oils from my fingers.

It becomes difficult to have a nice even wash when this happens.

Here is my tip for the day:

Instead of drawing directly onto your paper, draw your image out on tracing paper. You can erase and smudge to your little heart's content and not ruin your paper.

After it is on the tracing paper, it can then be transferred onto the watercolor paper using graphite/transfer paper.

Now your paper stays pristine. 

Plus you still have that drawing just in case your kids decide they want to paint on your painting when you are not looking.


Thursday, February 3, 2022

Basic Composition

  This entry was originally posted on Friday, February 3, 2012.

Composition is an important part of painting.

It will make or break a painting.
It seems to be a struggle with most artists.
However, there is one simple rule that seems to help with composition.
It is the Golden Ratio.
The Ancient Greeks determined that the Golden Ratio is the ideal ratio for aesthetics.


It is basically the idea that everything should be broken into thirds in order to be aesthetically pleasing.

This rule of thirds is a quick and easy solution to the composition dilemma.
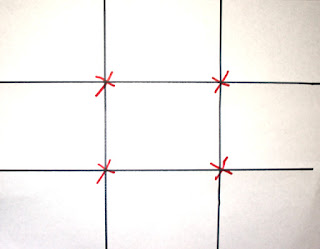
To start, divide your paper into thirds both horizontally and vertically.
It should look something like this:


Where the lines meet, that is where you want your center of focus to be.

Somewhere in one of these four spots.

There are other rules of composition that will help make a painting more dynamic.
And like all rules, they can be broken and the painting will still work.
Before you can do that though, you do need to start at the beginning.
This golden ratio is a good beginning.


Wednesday, February 2, 2022

The Best Tote Bag Ever

 This entry was originally posted on Thursday, February 2, 2012.


I am not an organized person but I have discovered that I need to be somewhat organized if I want to be able to paint wherever I go. Especially for plein air. I had one of those watercolor canvas bags that I use to carry around. It was too big and clumsy. So I went on a quest to find the perfect bag. It had to be small, lightweight, and it had to hold all my watercolor necessities (excluding the paper). The above it what I found. It is just a craft bag but the best part is that there is a space for everything, including my brush roll and my palette. Plus it is so cute! Bonus! 

I now carry it everywhere. I even keep it by my desk in my studio. I carry it upstairs to the kitchen when I want to work while the kids are doing homework. I take on the bus. I take it to my daughter's swim meets. I take it to Spain

It has a space for everything that I need to paint with. I now feel super organized and more efficient.  

If you are not into the animal or polka dot prints, there are lightweight canvas tote bags that can be found at hardware stores. They disguise themselves as tool bags but we all know that they work best as a watercolor tote. 

Tuesday, February 1, 2022

Pencils

  This entry was originally posted on Wednesday, February 1, 2012.

I like a sharp point on my pencil when I draw. I use to be constantly sharpening my special drawing pencils everywhere I went. I even went so far as to buy a battery powered pencil sharpener. Ha! I found that I was so concerned with have a sharp point that I never got to painting.

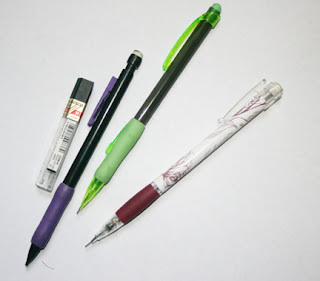
Then many years ago I discovered how handy mechanical pencils can be.

No more pencil sharpeners and I always have a sharp point.

Yay!

I buy packages of them and have them all over the house and in my studio now.

The lead in the mechanical pencils is usually a 2B, which works well. 

Lead that is too soft tends to smudge all over your paper when you brush your hand against the paper as you work.

Extra lead for mechanical pencils is also available as an H. This is harder than a 2B and also works well.

Especially if you are a smudger.


Monday, January 31, 2022

How-To Stretch Paper

 This entry was originally posted on Tuesday, January 31, 2012.

Stretching paper is a fairly simple process.

Just soak the paper in a cold water bath for 3-5 minutes each side.

Then staple it to a board. Lay flat to dry.

Okay but here are some more tips to help with this process.

If you soak it longer than the 3-5 minutes, the paper will break down too much and eventually the paper can disintegrate.

The board I use is just plywood (1/4"-1/2") that has been cut to fit a half sheet/ full sheet size. I then seal the plywood with a clear acrylic paint or some old house paint in neutral color. There are chemicals in the wood that I don't want leaching into my paper and that is why I seal it. I know that there are special stretcher boards out there but I don't like them, especially for my pours.
Gatorfoam board also works if you can find it.

The stapler I use is a staple gun with 8mm staples. The larger staples tend to poke out too much and the smaller staples end up popping out while the paper is drying.

Staple about 2-3 inches apart all away around the paper.
You just lay the paper flat on the board and staple all the way around.

When you soak your paper, the paper will expand because it is 100% cotton. It then shrinks as it is drying. In the meantime, you might see it warp and bubble on the board. Don't worry. This is normal. As long as it is laid flat in a dry room, it should be fine.

I usually allow my paper to dry overnight or 24 hrs before painting on it.

Once dry, it will be nice and tight with a beautiful surface, just like a canvas.

Sunday, January 30, 2022

Stretching Paper

 This entry was originally posted on Monday, January 30, 2012.

Stretching paper is not a necessary thing to do but some may wonder why it is done.

Here is why:

First of all, sometimes the paper will buckle and warp if you get it too wet. Some artists like to make sure it won't do that as they paint.

The other reason is that there is sizing (which is a gelatin) in your paper that is there to protect it.

Sizing inhibits the paint from flowing too much. Soaking the paper will remove the sizing and your paint will now be able to flow more.

I will only stretch my paper depending on what I am doing.

For instance, I stretch my paper when I am doing my pours and my portraits.

Even if it is 300lb.

For everything else, I usually just tape the paper to a board.

Sunday, January 23, 2022

Transparent vs. Opaque

 This entry was originally posted on Monday, January 23, 2012.

The next question you probably asked after my post about mud was 

"How do I know which of my paints are transparent and which are opaque?"


One simple test is to draw a line with a black permanent marker (like a Sharpie pen).

Now paint a line of each color over the black line. If you can no longer see the color, it is transparent.

If you can see the color on top of the line, it is opaque.

It may be hard to see from the photo but Cadmium Scarlet, French Ultramarine Blue, and Yellow Ochre are sitting on top of the line. This means that they are more opaque than the others. 

I put both Raw Sienna and Yellow Ochre on the chart to show my students the difference. They are similar in color but different in transparency. 

Each brand of paint also has a difference in transparency. For instance, I find that Winsor & Newton's Burnt Sienna is more transparent than Daniel Smith's. 

Friday, January 21, 2022

How Did I Get Mud?

 This entry was originally posted on Saturday, January 21, 2012.

It happens to all of us at one point or another.
We paint mud without wanting to paint mud.
This is perhaps the biggest frustration with beginning watercolorists.
So how do you not get mud?
The secret is to know the qualities of your paints.

Watercolor is an inherently transparent medium. However, there are some colors that are more opaque than others. It is by knowing which colors are which that helps you to understand how to stay away from mud.
How does this help?
The opaque colors tend to sit on the surface of the paper.
So you put a wash down with an opaque color and you want to do another wash on top of that. Instead of staying in the fibers of the paper, that opaque color will lift and mix with that new wash. Next thing you know, that beautiful clear color has turned to mud.
So you can do one of two things:
Don't mix too many opaques together when mixing colors and
Leave your opaques for the top washes.

Thursday, January 20, 2022

Keeping It Fresh

 This entry was originally posted on Friday, January 20, 2012.


So you have already squirted all your paint into your palette and it is hard and crusty by now. Every time you try to get rich color you have to scrub and scrub at it with your brush, possibly ruining that gorgeous sable and you still can't seem to get a nice rich dark color. What to do?

Instead of chiseling it out and deciding to start over, just spray your palette really well, put a wet sponge inside of it and keep it covered. Leave it for a day or two and viola! your paint is nice and juicy again.

Wednesday, January 19, 2022

Fresh Paint

 This entry was originally posted on Thursday, January 19, 2012.

I know that there are those artists out there that like to squeeze out the whole tube into their palette. Then the paint is dried in your palette and ready for your next painting adventure.

But I am not one of those. I love fresh paint!! The colors seem so much richer when the paint is fresh and you can get your darks and your blacks quicker and easier. No more wishy washy watercolors!

Just keep your tubes handy and squirt out a little bit at a time. More if you plan to paint more. Is it really that much harder to carry around a few extra tubes of paint?

Tuesday, January 18, 2022

Label Your Palette

 This entry was originally posted on Wednesday, January 18, 2012.


Another helpful tip in trying to remember your colors is to label your palette.

Just a piece of masking tape and a pen does the trick.

Monday, January 17, 2022

Arranging Your Palette

 This entry was originally posted on Tuesday, January 17, 2012.


One question I get asked by beginning watercolorists is about how to arrange the colors on a palette.

When arranging your palette, it is best to put all your yellows together, then all your reds, and finally all your blues. I also like to keep my colors that I mix often close together (such as French Ultramarine Blue and Burnt Sienna)

I also always position my palette the same way when I paint. I now know where each one of my colors is and I don't have to think about which color is which while I am painting.


Friday, January 14, 2022

Where Did I Put My Brush?!!

 This entry was originally posted on Saturday, January 14, 2012.


I am constantly losing my brushes. I put the big one down to use the little one. Then I put that one down to use a scrub brush. Then I go back to the big one and it has rolled somewhere under my painting or my palette or off the table. Ugh! I feel like I spend more time looking for my brushes than actually painting.

Then a friend suggested that I cut notches into the top of my water container. And viola! no more lost brushes! (That is if I remember to put it back into the notch).

Thursday, January 13, 2022

Treatment of Brushes


This entry was originally posted on Friday,, January 13, 2012.

NEVER EVER LEAVE YOUR BRUSH IN WATER!

First of all, if you leave it in the water, the tip will bend or break.

Or the handle will become waterlogged and crack.

So you don't want to dry it standing up either.

The best way to dry your brush is to lay it flat and leave it flat in between washes.